
We are going to teach you how to create multi step form in PHP MySQL using Bootstrap. it is nice technique where you want to break the form fields into multiple categories. and the design is also responsive it looks great for mobile and tablets device we are creating responsive this theme using bootstrap. to create this multi step form i have used Bootstrap and JQuery to create responsive layout and validating front end and i have also used PHP MySQL to Validating For on server side.
How to Create Multi Step Form in PHP MySQL using Bootstrap
1-Creating Database
- Open Phpmyadmin in your Browser
- Click on Database Tab Display on Top side
- Give the Database name “multi“.
- After Creating Database Open it.
- Click on SQL Tab on Top area
- Copy the Below Source Code and paste it.
- Then Click on Go.
-- phpMyAdmin SQL Dump
-- version 4.2.7.1
-- http://www.phpmyadmin.net
--
-- Host: 127.0.0.1
-- Generation Time: Feb 16, 2016 at 09:33 AM
-- Server version: 5.6.20
-- PHP Version: 5.5.15

SET SQL_MODE = "NO_AUTO_VALUE_ON_ZERO";
SET time_zone = "+00:00";


/*!40101 SET @OLD_CHARACTER_SET_CLIENT=@@CHARACTER_SET_CLIENT */;
/*!40101 SET @OLD_CHARACTER_SET_RESULTS=@@CHARACTER_SET_RESULTS */;
/*!40101 SET @OLD_COLLATION_CONNECTION=@@COLLATION_CONNECTION */;
/*!40101 SET NAMES utf8 */;

--
-- Database: `multi`
--

-- --------------------------------------------------------

--
-- Table structure for table `post`
--

CREATE TABLE IF NOT EXISTS `post` (
`id` int(100) NOT NULL,
  `name` text NOT NULL,
  `user_name` text NOT NULL,
  `mobile` text NOT NULL,
  `dob` text NOT NULL,
  `email` text NOT NULL,
  `password` text NOT NULL,
  `confirm_password` text NOT NULL,
  `image` varchar(1000) NOT NULL
) ENGINE=InnoDB  DEFAULT CHARSET=latin1 AUTO_INCREMENT=14 ;

--
-- Indexes for dumped tables
--

--
-- Indexes for table `post`
--
ALTER TABLE `post`
 ADD PRIMARY KEY (`id`);

--
-- AUTO_INCREMENT for dumped tables
--

--
-- AUTO_INCREMENT for table `post`
--
ALTER TABLE `post`
MODIFY `id` int(100) NOT NULL AUTO_INCREMENT,AUTO_INCREMENT=14;
/*!40101 SET CHARACTER_SET_CLIENT=@OLD_CHARACTER_SET_CLIENT */;
/*!40101 SET CHARACTER_SET_RESULTS=@OLD_CHARACTER_SET_RESULTS */;
/*!40101 SET COLLATION_CONNECTION=@OLD_COLLATION_CONNECTION */;
2- Import DB File
After Downloading the source code extract it in your root folder.
- Open Phpmyadmin in your Browser
- Click on Database Tab Display on Top side
- Give the Database name “multi“.
- After Creating Database Open it.
- Click on Import Tab on Top area
- You can Find Db file in Downloaded source code Select it.
- Then Click on Go.
3- Creating Database Connection
After import Database File then next step is creating database connection using php copy the below code and save it is as “db.php”.
<?php
mysql_connect("localhost","root","");
 mysql_select_db("multi");
?>
Creating Form Step By Step
In this step we are going to create three step multi form. First step it will ask for the Name, User Name and Mobile Number in second step it will ask for Date Of Birth, Your Email and User Image and third step it will ask for the Password. All these steps are properly validated before process to the next step.
Creating First Step Form
 <div id="sf1" class="frm">
          <fieldset>
            <legend>Step 1 of 3</legend>

            <div class="form-group">
              <label class="col-lg-2 control-label" for="uname">Your Name: </label>
              <div class="col-lg-6">
                <input type="text" placeholder="Your Name" id="uname" name="name" class="form-control" autocomplete="off">
              </div>
            </div><br />
			<div class="clearfix" style="height: 10px;clear: both;"></div>
			 <div class="form-group">
              <label class="col-lg-2 control-label" for="uname">User name: </label>
              <div class="col-lg-6">
                <input type="text" placeholder="User Name" id="uname" name="u_name" class="form-control" autocomplete="off">
              </div>
            </div>
            <div class="clearfix" style="height: 10px;clear: both;"></div>

			<div class="form-group">
              <label class="col-lg-2 control-label" for="uname">Moblie Number</label>
              <div class="col-lg-6">
                <input type="text" placeholder="Enter Your Mobile Number" id="uname" name="number" class="form-control" autocomplete="off">
              </div>
            </div>
            <div class="clearfix" style="height: 10px;clear: both;"></div>

            <div class="form-group">
              <div class="col-lg-10 col-lg-offset-2">
                <button class="btn btn-success open1" type="button">Next <span class="fa fa-arrow-right"></span></button>
              </div>
            </div>

          </fieldset>
</div>
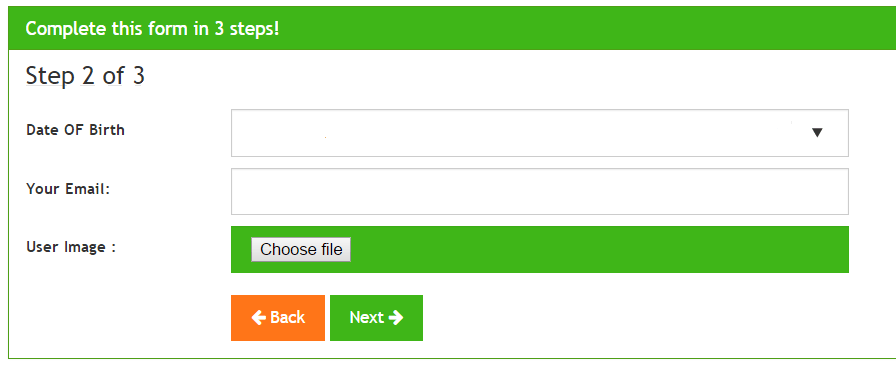
Creating Second Step Form
  <div id="sf2" class="frm" style="display: none;">
          <fieldset>
            <legend>Step 2 of 3</legend>


			<div class="form-group">
              <label class="col-lg-2 control-label" for="uemail">Date OF Birth</label>
              <div class="col-lg-6">
                <input type="date" placeholder="Your Email" id="uemail" name="dob" class="form-control" autocomplete="off">
              </div>
            </div>

			 <div class="clearfix" style="height: 10px;clear: both;"></div>
            <div class="form-group">
              <label class="col-lg-2 control-label" for="uemail">Your Email: </label>
              <div class="col-lg-6">
                <input type="text" placeholder="Your Email" id="uemail" name="uemail" class="form-control" autocomplete="off">
              </div>
            </div>

            <div class="clearfix" style="height: 10px;clear: both;"></div>

				 <div class="form-group">
              <label class="col-lg-2 control-label" for="uemail">User Image :  </label>
              <div class="col-lg-6">
                <input type="file" id="uemail" name="image" class="btn btn-success form-control" autocomplete="off">
              </div>
            </div>

            <div class="clearfix" style="height: 10px;clear: both;"></div>


            <div class="clearfix" style="height: 10px;clear: both;"></div>

            <div class="form-group">
              <div class="col-lg-10 col-lg-offset-2">
                <button class="btn btn-warning back2" type="button"><span class="fa fa-arrow-left"></span> Back</button>
                <button class="btn btn-success open2" type="button">Next <span class="fa fa-arrow-right"></span></button>
              </div>
            </div>

          </fieldset>
        </div>
Creating Third Step Form
 <div id="sf3" class="frm" style="display: none;">
          <fieldset>
            <legend>Step 3 of 3</legend>

            <div class="form-group">
              <label class="col-lg-2 control-label" for="upass1">Password: </label>
              <div class="col-lg-6">
                <input type="password" placeholder="Your Password" id="upass1" name="upass1" class="form-control" autocomplete="off">
              </div>
            </div>
            <div class="clearfix" style="height: 10px;clear: both;"></div>

            <div class="form-group">
              <label class="col-lg-2 control-label" for="upass1">Confirm Password: </label>
              <div class="col-lg-6">
                <input type="password" placeholder="Confirm Password" id="upass2" name="upass2" class="form-control" autocomplete="off">
              </div>
            </div>

            <div class="clearfix" style="height: 10px;clear: both;"></div>

            <div class="form-group">
              <div class="col-lg-10 col-lg-offset-2">
                <button class="btn btn-warning back3" type="button"><span class="fa fa-arrow-left"></span> Back</button>
                <button class="btn btn-success" type="submit" name="submit">Submit </button>
                <img src="images/spinner.gif" alt="" id="loader" style="display: none">
              </div>
            </div>

          </fieldset>
        </div>
Validating Form using JQuery
Next step is Bind the form with the JQuery validator to validate the form . it will return true OR false on the basis of user input. I have added class names for the Back and next buttons in each container. Check out the below Source Code.
<script type="text/javascript">

  jQuery().ready(function() {

    // validate form on keyup and submit
    var v = jQuery("#basicform").validate({
      rules: {
		    name: {
          required: true,
          minlength: 2,
          maxlength: 16
        },
        u_name: {
          required: true,
          minlength: 2,
          maxlength: 16
        },
        uemail: {
          required: true,
          minlength: 2,
          email: true,
          maxlength: 100,
        },
        upass1: {
          required: true,
          minlength: 6,
          maxlength: 15,
        },
        upass2: {
          required: true,
          minlength: 6,
          equalTo: "#upass1",
        }

      },
      errorElement: "span",
      errorClass: "help-inline-error",
    });

    $(".open1").click(function() {
      if (v.form()) {
        $(".frm").hide("fast");
        $("#sf2").show("slow");
      }
    });

    $(".open2").click(function() {
      if (v.form()) {
        $(".frm").hide("fast");
        $("#sf3").show("slow");
      }
    });

    $(".open3").click(function() {
      if (v.form()) {
        $("#loader").show();
         setTimeout(function(){
           $("#basicform").html('<h2>Thanks for your time.</h2>');
         }, 1000);
        return false;
      }
    });

    $(".back2").click(function() {
      $(".frm").hide("fast");
      $("#sf1").show("slow");
    });

    $(".back3").click(function() {
      $(".frm").hide("fast");
      $("#sf2").show("slow");
    });

  });
</script>
Validating Form on Server Side using PHP MySQL
Next step is Validating Form into Server side using PHP MySQL. Check the below source code this is the last step.
<?php

include("includes/db.php");
if(isset($_POST['submit'])){


	$name = $_POST['name'];
	$user_name = $_POST['u_name'];
	$mobile = $_POST['number'];
	$dob = $_POST['dob'];
	$email = $_POST['uemail'];
	$pass = $_POST['upass1'];
	$c_pass = $_POST['upass2'];
	$image_name = $_FILES['image']['name'];
	$image_type = $_FILES['image']['type'];
	$image_size = $_FILES['image']['size'];
	$image_tmp  = $_FILES['image']['tmp_name'];


	if($image_type=="image/jpeg" or $image_type=="image/png" or
	$image_type=="image/gif"){

		if($image_size<=500000){
		move_uploaded_file($image_tmp,"images/$image_name");
		}
		else{
		echo "<script>alert('Image size is larger, only 50kb size is allowed ')</script>";
		}


	}
	else{
	echo "<script>alert('Image type is invalid')</script>";
	}

	$query= "insert into post(name,user_name,mobile,dob,email,password,confirm_password,image)
			values('$name','$user_name','$mobile','$dob','$email','$pass','$c_pass','$image_name')";

	if(mysql_query($query)){

	echo "<h1 class='center'>Done</h1>";

	}}
?>
Preview
Download Complete Source Code Here..
This is a good example, just some problem in the mySQL conectting, others are good.